NUT
Motivation
I have intended to configure Network UPS Tools for quite some time but have put it off. HaynesTower has been using unRAID’s built in tools to do what the rest of these devices will need and has it’s own UPS. A recent power outage corrupted my proxmox install for one of the MS-01 nodes. Recovery was a breeze but it’s time to get nutty so this doesn’t happen again.
I will be starting out with this guide. Then I’ll take a look at monitoring the UPS with something like what is suggested here.
HaynesTower UPS
As I mentioned earlier, HaynesTower has had a UPS set up that only unRAID is looking at thanks to it’s out of the box capabilities of connecting up to a APC UPS’s USB port and setting up safe power off/on. At one point I had HomeAssistant monitoring it’s power consumption but it has not been able to connect to it for a while. A few tricks were needed there that I will pull out for the PVE NUT:
Broken Home Assistant Monitoring
/config/packages/sensors.yaml
template:
  - sensor:
      - name: "UPS Watt Load"
        unique_id: "apc_ups_watt_load"
        state_class: measurement
        device_class: power
        unit_of_measurement: "W"
        state: "0"
And this is loaded in configurations.yaml right at the top:
# Loads default set of integrations. Do not remove.
default_config:

homeassistant:
  packages: !include_dir_named packages
  auth_providers:
    - type: homeassistant
    - type: trusted_networks
      trusted_networks:
        - 192.168.0.0/24
        - 127.0.0.1
unRAID NUT
In the spirit of consolidating everything to the nut-server / nut-client approach I will also set up a nut-server from unRAID. I can then use my new HAOS to monitor whatever number of UPS’s I end up with.
This was as easy as installing the Network UPS Tools plugin for unRAID, disabling the built in UPS stuff under UPS Settings, and configuring the new plugin to be something like this:
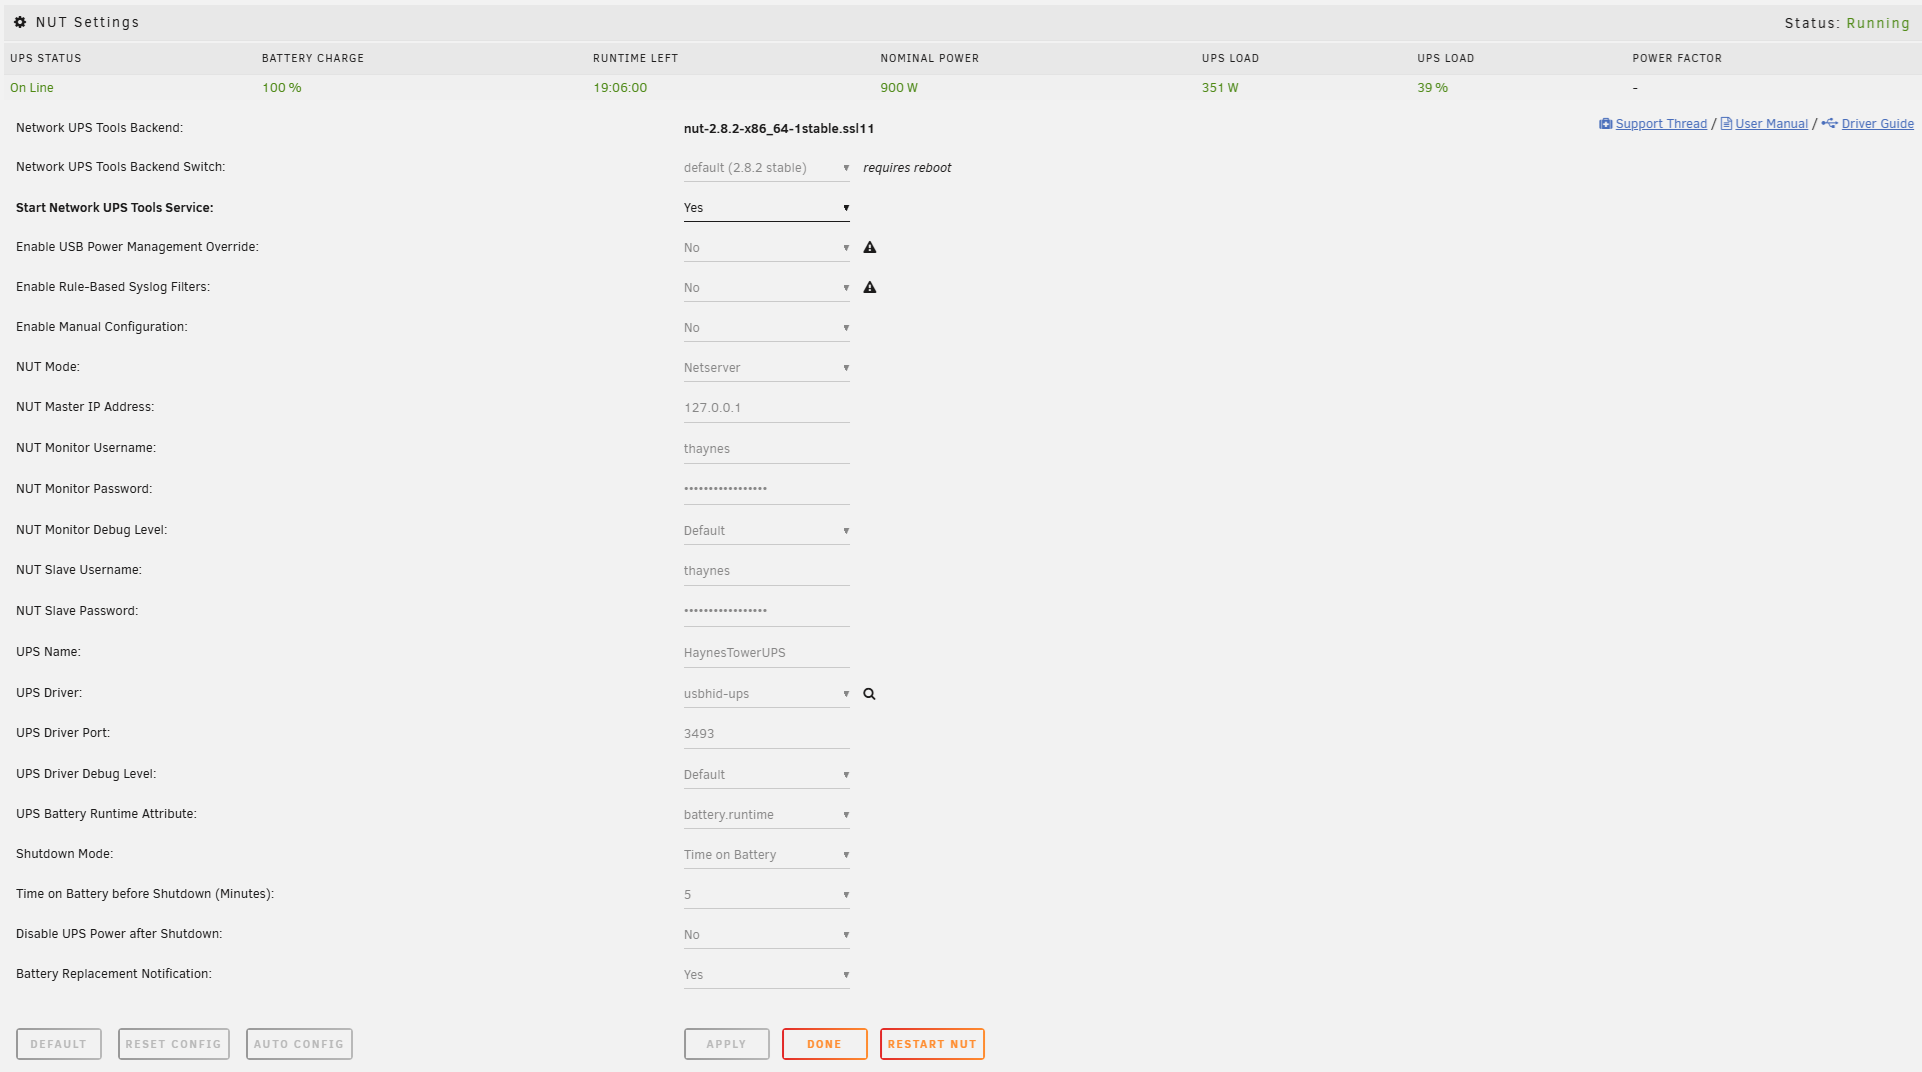
I will save all tests until I finish getting the rest of the servers configured but I don’t think this one will be any trouble as the plugin was a breeze to setup.
My dashboard card also automatically updated and looks a bit more minamalist now:

HAOS NUT Monitoring
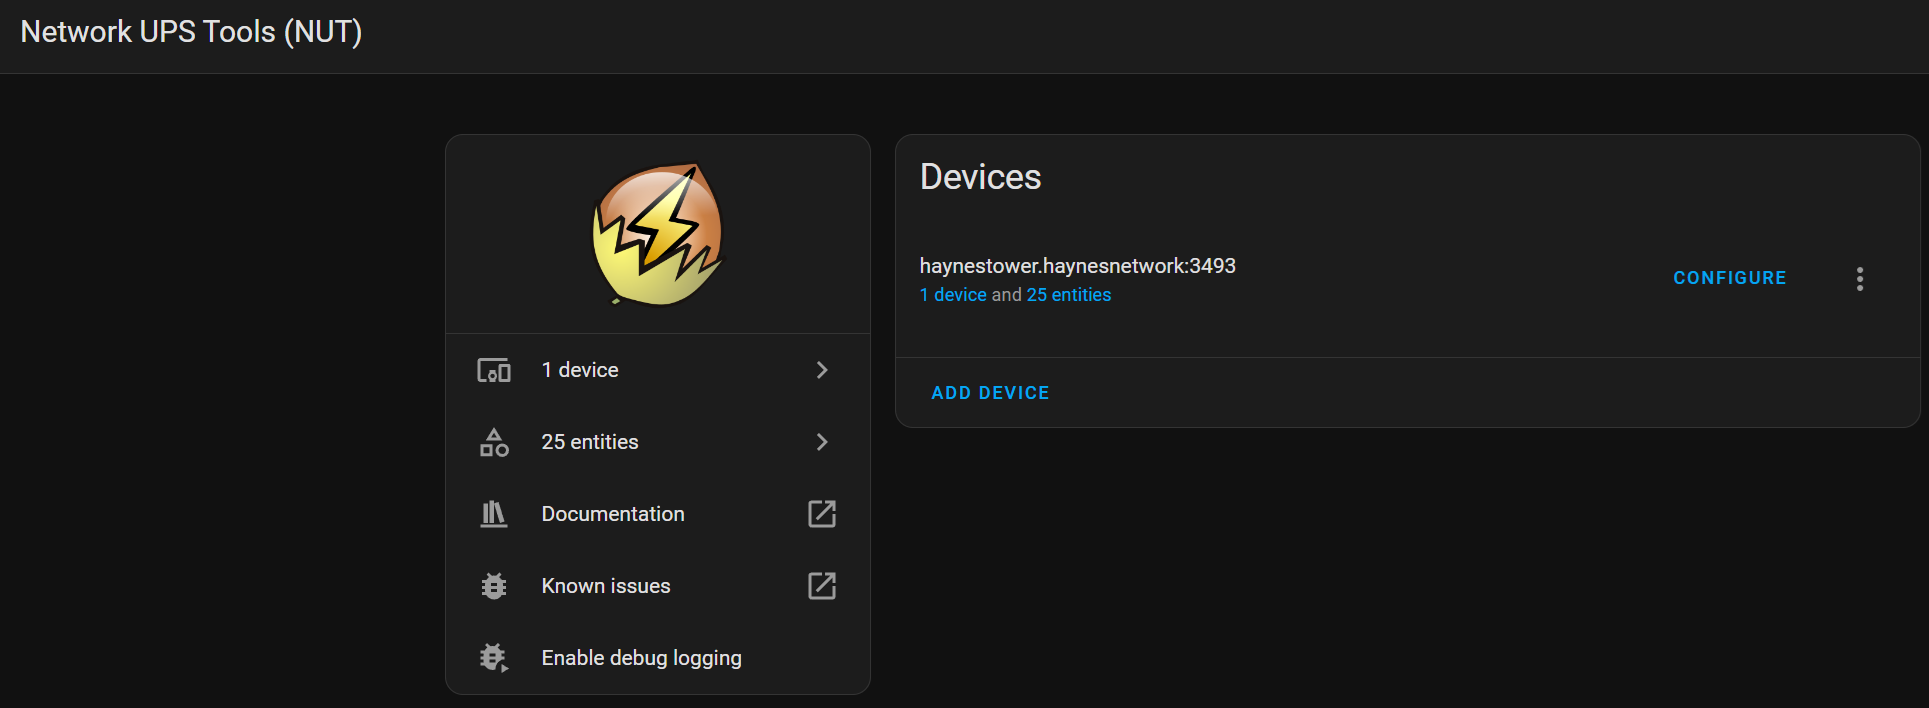
I still could not connect my HAOS VM on unRAID to the NUT monitoring API but my fresh install running on the proxmox cluster had no problem:
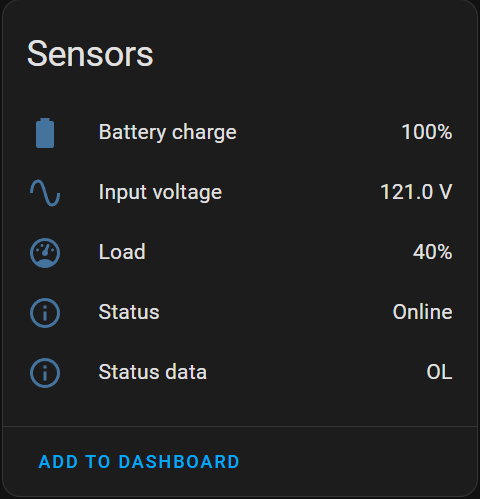
The NUT was no better about reporting power consumption:
However, the install of HAOS I pulled that config from is a mess and has two sensors.yaml files, one in packages and the other as a sub-configuration file split from configuration.yaml. I don’t remember which was the correct way to do it so I gave the UI a shot and found it was quite simple:
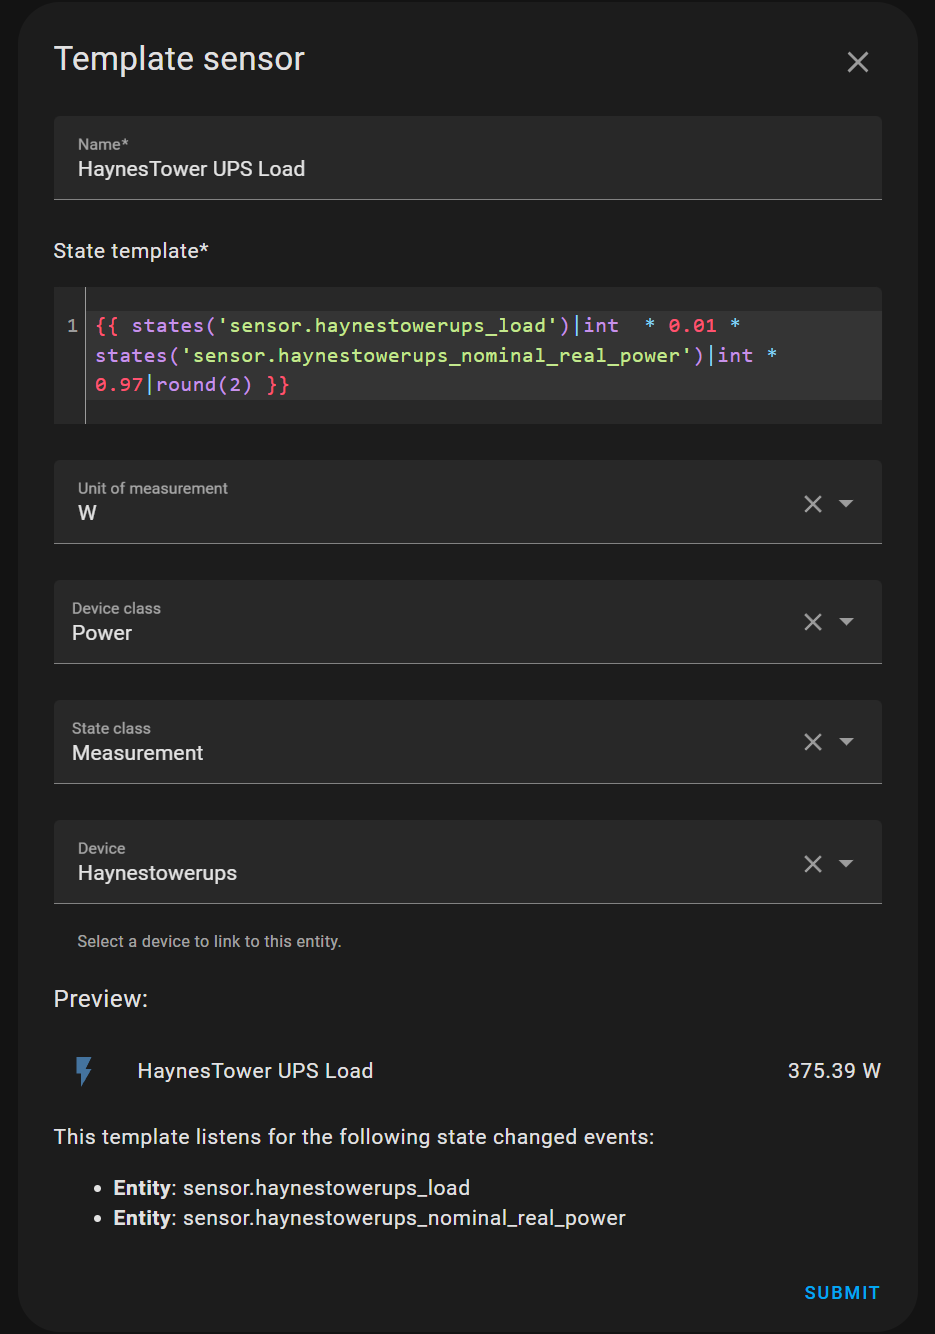
That even linked it upo to the NUT device as one of it’s sensors which my manual sensor did not do before. Hopefully we can keep the improvements up as I migrate to the proxmox hosted HAOS for November’s big move.
Fitlet3 w/ USB Connected UPS
TODO add a page in hardware
My APC UPS that all the MS-01’s are connected to is has no network capabilities and is plugged in via usb to a fitlet3 mini pc thing which I’ve been accidently calling filet3. These are currently the smallest devices I’ve put proxmox on but the s100 would work well for this too if I needed to serve something connected via USB anywhere in throughout the house.
The plan is to setup an LXC with the nut-server on the fitlet3. For monitoring I may just use home-assistant but I’ll explore what’s out there. Then I will install nut-client on each host and configure them to safely power down
Installing the NUT
First I checked the devices the unprivaldged lcx could see:
root@nut01:~# lsusb
Bus 002 Device 001: ID 1d6b:0003 Linux Foundation 3.0 root hub
Bus 001 Device 004: ID 8087:0032 Intel Corp. AX210 Bluetooth
Bus 001 Device 003: ID 0403:6014 Future Technology Devices International, Ltd FT232H Single HS USB-UART/FIFO IC
Bus 001 Device 002: ID 051d:0002 American Power Conversion Uninterruptible Power Supply
Bus 001 Device 001: ID 1d6b:0002 Linux Foundation 2.0 root hub
Since it was there I moved to the next stap. Nothing fancy to install nut:
sudo apt update
sudo apt install nut nut-client nut-server
But looking deeper showed I’m going to have a problem:
root@nut01:~# lsusb -v
...
Bus 001 Device 002: ID 051d:0002 American Power Conversion Uninterruptible Power Supply
Couldn't open device, some information will be missing
USB Passthrough
The LXC can see my USB devices right off the bat. People seem to have permission issues fixed with methods like this. I’ll have to see if I have problems before I fiddle.
Sure enough the LXC could not open the USB.
root@nut01:~# sudo nut-scanner -U
Scanning USB bus.
Failed to open device bus '001', skipping: No such device (it may have been disconnected)
Here was someone with the exact same issue and steps to resolve which looked promising. I tried the lxc.mount.entry one first but it did not work. Here is what worked:
Shut down the LXC and go to the pve shell to find the bus and device:
root@pve-filet01:~# lsusb
...
Bus 001 Device 002: ID 051d:0002 American Power Conversion Uninterruptible Power Supply
Use pct set to edit the lxc’s config with this device:
pct set 123 --dev0 path=/dev/bus/usb/001/002,mode=0666
This added the following to /etc/pve/lxc/123.conf
dev0: path=/dev/bus/usb/001/002,mode=0666
Now I get a result:
root@nut01:~# sudo nut-scanner -U
Scanning USB bus.
[nutdev1]
        driver = "usbhid-ups"
        port = "auto"
        vendorid = "051D"
        productid = "0002"
        product = "Back-UPS RS 1500MS2 FW:969.e4 .D USB FW:e4"
        serial = "0B2410L42417"
        vendor = "American Power Conversion"
        bus = "001"
Configuring NUT Server
The video guide here was great for setting this up. Below are the configs I came up with while following along.
WARNING Techno Tim had some bad configs. They are pretty easy to catch but I’ve left below what is from the video. After I’ve included corrections
Define the UPS
/etc/nut/ups.conf
[APC-900W-01]
    driver = usbhid-ups
    port = auto
    desc = "APC UPS 1500VA BR1500MS2"
    vendorid = 051D
    productid = 0002
    serial = 0B2410L42417
Setup a Monitor
nano /etc/nut/upsmon.conf
RUN_AS_USER root

MONITOR APC-900W-01@localhost 1 admin PASSWORD master
Listen for any IP
Since this server will be accessed by clients we need to listen for any IP on the default port.
nano /etc/nut/upsd.conf
LISTEN 0.0.0.0 3493
Set Server Mode
nano /etc/nut/nut.conf
MODE=netserver
Add a User
nano /etc/nut/upsd.users
[monuser]
  password = PASSWORD
  admin master
After all the coonfiguring is complete we can reboot the LXC for the changes to take effect.
Once back up run the following to test the configs are good:
root@nut01:~# upsc APC-900W-01@localhost
Init SSL without certificate database
battery.charge: 100
battery.charge.low: 10
battery.charge.warning: 50
battery.date: 2001/09/25
battery.mfr.date: 2024/03/10
battery.runtime: 663
battery.runtime.low: 120
battery.type: PbAc
battery.voltage: 27.3
battery.voltage.nominal: 24.0
device.mfr: American Power Conversion
device.model: Back-UPS RS 1500MS2
device.serial: 0B2410L42417
device.type: ups
driver.name: usbhid-ups
driver.parameter.pollfreq: 30
driver.parameter.pollinterval: 1
driver.parameter.port: auto
driver.parameter.productid: 0002
driver.parameter.serial: 0B2410L42417
driver.parameter.synchronous: auto
driver.parameter.vendorid: 051D
driver.version: 2.8.0
driver.version.data: APC HID 0.98
driver.version.internal: 0.47
driver.version.usb: libusb-1.0.26 (API: 0x1000109)
input.sensitivity: medium
input.transfer.high: 144
input.transfer.low: 88
input.transfer.reason: input voltage out of range
input.voltage: 116.0
input.voltage.nominal: 120
ups.beeper.status: enabled
ups.delay.shutdown: 20
ups.firmware: 969.e4 .D
ups.firmware.aux: e4
ups.load: 51
ups.mfr: American Power Conversion
ups.mfr.date: 2024/03/10
ups.model: Back-UPS RS 1500MS2
ups.productid: 0002
ups.realpower.nominal: 900
ups.serial: 0B2410L42417
ups.status: OL
ups.test.result: No test initiated
ups.timer.reboot: 0
ups.timer.shutdown: -1
ups.vendorid: 051d
Monitoring in Home Assistant
The guide next goes into installing a webserver for monitoring which is something I will likely do. However, I first want to test connectivity quickly with my HAOS VM running on a different proxmox host.
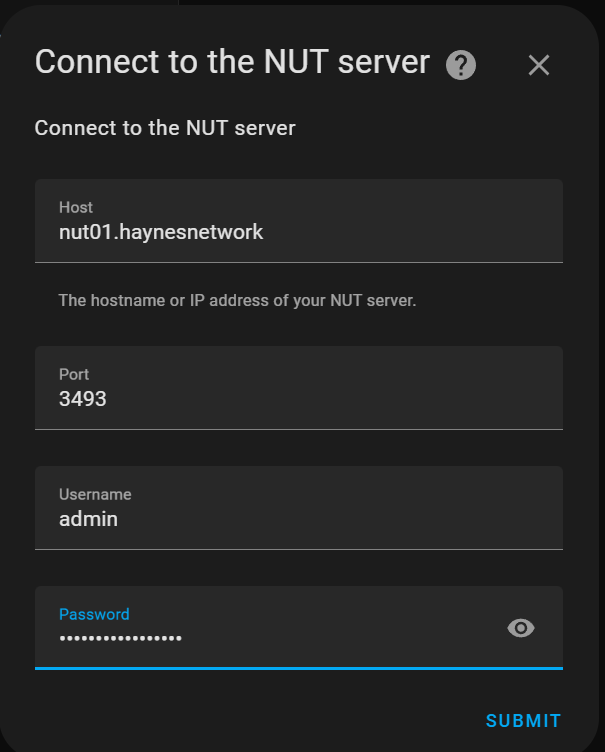
Fortunatly adding the new NUT server to Home Assistant for monitoring was a breeze:
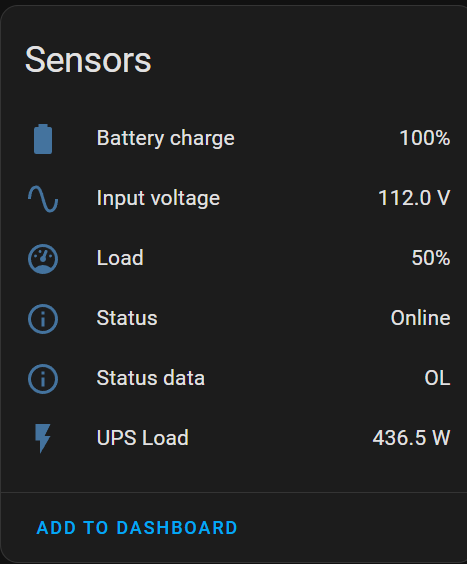
I also added the same custom template sensor as we did for unRAID:
0
Which now produced the data I can later add to a UPS monitoring dashboard!
Unlike unRAID’s UPS I did not have a view of the load unless I used the screen on the UPS itself for this one. But I did have a per-device view from the UniFi PDU this UPS was powering:
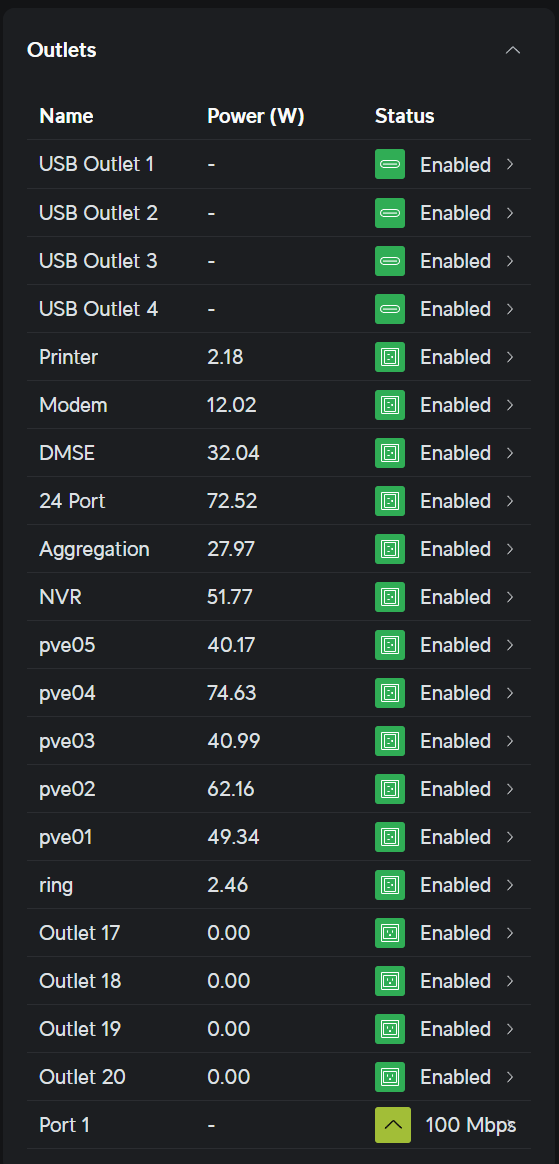
Numbers seem to add up so we are good to move onto either additional monitoring or the clients!
Setting up Clients
I finished watching the YouTube video and decided that the monitoring there wasn’t great and if I wanted something on top of Home Assistant it would best be ran on the k8s cluster.
Before installing on each node I also updated everything:
apt update
apt upgrade
pveam update
apt install nut-client
Configure Monitor
/etc/nut/upsmon.conf
RUN_AS_USER root

MONITOR [email protected] 1 admin PASSWORD slave

MINSUPPLIES 1
SHUTDOWNCMD "/sbin/shutdown -h"
NOTIFYCMD /usr/sbin/upssched
POLLFREQ 2
POLLFREQALERT 1
HOSTSYNC 15
DEADTIME 15
POWERDOWNFLAG /etc/killpower

NOTIFYMSG ONLINE    "UPS %s on line power"
NOTIFYMSG ONBATT    "UPS %s on battery"
NOTIFYMSG LOWBATT   "UPS %s battery is low"
NOTIFYMSG FSD       "UPS %s: forced shutdown in progress"
NOTIFYMSG COMMOK    "Communications with UPS %s established"
NOTIFYMSG COMMBAD   "Communications with UPS %s lost"
NOTIFYMSG SHUTDOWN  "Auto logout and shutdown proceeding"
NOTIFYMSG REPLBATT  "UPS %s battery needs to be replaced"
NOTIFYMSG NOCOMM    "UPS %s is unavailable"
NOTIFYMSG NOPARENT  "upsmon parent process died - shutdown impossible"

NOTIFYFLAG ONLINE   SYSLOG+WALL+EXEC
NOTIFYFLAG ONBATT   SYSLOG+WALL+EXEC
NOTIFYFLAG LOWBATT  SYSLOG+WALL
NOTIFYFLAG FSD      SYSLOG+WALL+EXEC
NOTIFYFLAG COMMOK   SYSLOG+WALL+EXEC
NOTIFYFLAG COMMBAD  SYSLOG+WALL+EXEC
NOTIFYFLAG SHUTDOWN SYSLOG+WALL+EXEC
NOTIFYFLAG REPLBATT SYSLOG+WALL
NOTIFYFLAG NOCOMM   SYSLOG+WALL+EXEC
NOTIFYFLAG NOPARENT SYSLOG+WALL

RBWARNTIME 43200

NOCOMMWARNTIME 600

FINALDELAY 5
Set as Client
nano /etc/nut/nut.conf
MODE=netclient
Configure Timers
WARNING See below for why this is broken
nano /etc/nut/upssched.conf
CMDSCRIPT /etc/nut/upssched-cmd
PIPEFN /etc/nut/upssched.pipe
LOCKFN /etc/nut/upssched.lock

AT ONBATT * START-TIMER onbatt 300
AT ONLINE * CANCEL-TIMER onbatt online
AT ONBATT * START-TIMER earlyshutdown 300
AT LOWBATT * EXECUTE onbatt
AT COMMBAD * START-TIMER commbad 300
AT COMMOK * CANCEL-TIMER commbad commok
AT NOCOMM * EXECUTE commbad
AT SHUTDOWN * EXECUTE powerdown
AT SHUTDOWN * EXECUTE powerdown
Add Script for upssched to Call
WARNING See below for why this is broken
nano /etc/nut/upssched-cmd
#!/bin/sh
 case $1 in
       onbatt)
          logger -t upssched-cmd "UPS running on battery"
          ;;
       earlyshutdown)
          logger -t upssched-cmd "UPS on battery too long, early shutdown"
          /usr/sbin/upsmon -c fsd
          ;;
       shutdowncritical)
          logger -t upssched-cmd "UPS on battery critical, forced shutdown"
          /usr/sbin/upsmon -c fsd
          ;;
       upsgone)
          logger -t upssched-cmd "UPS has been gone too long, can't reach"
          ;;
       *)
          logger -t upssched-cmd "Unrecognized command: $1"
          ;;
 esac
chmod +x /etc/nut/upssched-cmd
And then put changes into effect via systemctl restart nut-client.
Fixing Techno Tim’s Configs
Few issues here. First earlyshutdown is never canceled. Second upsgone is called commok in the schedual and will never be invoked in the bash script which is just a warning anyway. There is also a online and commok defined in the schedual that have nothing in the switch statement for.
This can be fixed quickly by adding AT ONLINE * CANCEL-TIMER earlyshutdown so you don’t shut down after a flicker but some of the configs people suggested in the comments are a lot cleaner. I went with:
upssched
nano /etc/nut/upssched.conf
CMDSCRIPT /etc/nut/upssched-cmd
PIPEFN /etc/nut/upssched.pipe
LOCKFN /etc/nut/upssched.lock

# Starts a timer when the UPS switches to battery power
AT ONBATT * START-TIMER shutdown_timer 300

# Cancels the shutdown timer when power is restored
AT ONLINE * CANCEL-TIMER shutdown_timer

# Executes immediate shutdown when battery is low
AT LOWBATT * EXECUTE immediate_shutdown

# Starts a timer on communication failure
AT COMMBAD * START-TIMER commbad_timer 300

# Cancels the communication failure timer when communication is restored
AT COMMOK * CANCEL-TIMER commbad_timer

# Executes shutdown on persistent communication failure
AT NOCOMM * EXECUTE commbad_shutdown

# Executes powerdown on system shutdown
AT SHUTDOWN * EXECUTE powerdown
upssched-cmd
nano /etc/nut/upssched-cmd
#!/bin/sh

case $1 in
    shutdown_timer)
        # Log the event and initiate a controlled shutdown
        logger -t upssched-cmd "UPS running on battery for too long, initiating shutdown"
        /usr/sbin/upsmon -c fsd
        ;;

    immediate_shutdown)
        # Log the critical battery status and initiate immediate shutdown
        logger -t upssched-cmd "UPS on battery critical, forced shutdown"
        /usr/sbin/upsmon -c fsd
        ;;

    commbad_timer)
        # Log persistent communication failures and initiate shutdown
        logger -t upssched-cmd "UPS communication failure persists, initiating shutdown"
        /usr/sbin/upsmon -c fsd
        ;;

    commbad_shutdown)
        # Log communication failure and initiate shutdown
        logger -t upssched-cmd "UPS communication failed, initiating shutdown"
        /usr/sbin/upsmon -c fsd
        ;;

    powerdown)
        # Log the execution of the shutdown
        logger -t upssched-cmd "Executing powerdown command"
        ;;

    *)
        # Log unknown commands
        logger -t upssched-cmd "Unrecognized command: $1"
        ;;
esac
chmod +x /etc/nut/upssched-cmd
Then apply:
systemctl restart nut-client
Testing Disconnect from NUT Server
On CLIENT we can verify the UPS is hit.
First restart for
systemctl restart nut-client
root@pve01:/etc/nut# upsc [email protected]
Init SSL without certificate database
battery.charge: 100
battery.charge.low: 10
battery.charge.warning: 50
battery.date: 2001/09/25
battery.mfr.date: 2024/03/10
battery.runtime: 654
battery.runtime.low: 120
battery.type: PbAc
battery.voltage: 27.4
battery.voltage.nominal: 24.0
device.mfr: American Power Conversion
device.model: Back-UPS RS 1500MS2
device.serial: 0B2410L42417
device.type: ups
driver.name: usbhid-ups
driver.parameter.pollfreq: 30
driver.parameter.pollinterval: 1
driver.parameter.port: auto
driver.parameter.productid: 0002
driver.parameter.serial: 0B2410L42417
driver.parameter.synchronous: auto
driver.parameter.vendorid: 051D
driver.version: 2.8.0
driver.version.data: APC HID 0.98
driver.version.internal: 0.47
driver.version.usb: libusb-1.0.26 (API: 0x1000109)
input.sensitivity: medium
input.transfer.high: 144
input.transfer.low: 88
input.transfer.reason: input voltage out of range
input.voltage: 114.0
input.voltage.nominal: 120
ups.beeper.status: enabled
ups.delay.shutdown: 20
ups.firmware: 969.e4 .D
ups.firmware.aux: e4
ups.load: 52
ups.mfr: American Power Conversion
ups.mfr.date: 2024/03/10
ups.model: Back-UPS RS 1500MS2
ups.productid: 0002
ups.realpower.nominal: 900
ups.serial: 0B2410L42417
ups.status: OL
ups.test.result: No test initiated
ups.timer.reboot: 0
ups.timer.shutdown: -1
ups.vendorid: 051d
On SERVER:
systemctl restart nut-server
And we get messages in the client showing the disconnect!
Broadcast message from root@pve01 (somewhere) (Mon Jul 22 23:44:17 2024):

Communications with UPS [email protected] lost


Broadcast message from root@pve01 (somewhere) (Mon Jul 22 23:44:21 2024):

Communications with UPS [email protected] established
Four More MS-01s
I took advantace of this procedure to update each of the five nodes. I also ran this command for pve:
pveam update
The rest was easy, just following the steps for the client above four more timee.
HaynesIntelligence NUT
Following my notes from above it was easy to setup the nut-server and nut-client for HaynesIntellegience which finalized my power consumption monitoring for the server room!
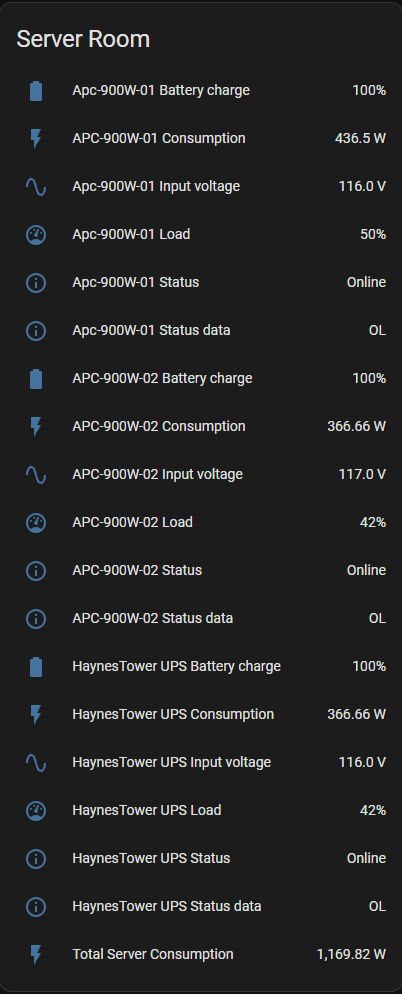
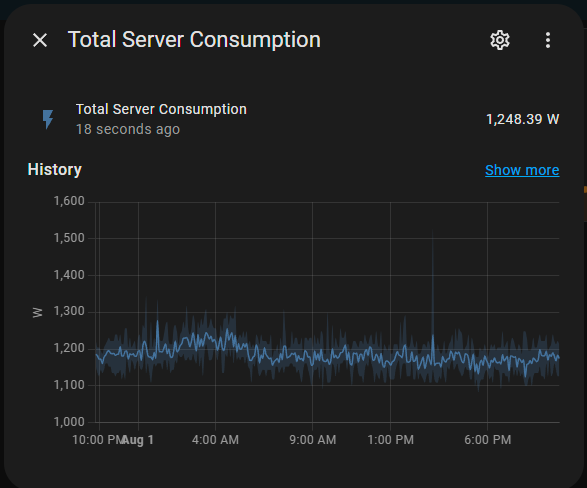
I was able to combine all three sensors into a total for the consuption of the servers:
Pulling the Plug
Coming soon - the final test!