LLM Stack
Ollama
Ollama is very popular for easily running various models. It has to be on a beefy server with GPU(s) to be performant and can use a ton of power just with simple prompts.
Right now this is running locally on HaynesIntelligence’s Pop!_OS VM.
Helm Chart is available if I want to get really fancy. It can also run in Docker but for now I’m keeping it as simple as possible since GPU passthrough is already being weird.
Ollama Stops Using GPUs
I noticed that rebooting the VM made it so ollama only used CPU. This has not happened since I followed these steps to update cuda though it’s still a weird old version (11.15) which won’t work with PyTorch.
I commented about this on a bug recently created and was pointed here. This reset procedure also seems promising if it happens again:
systemctl stop ollama
sudo rmmod nvidia_uvm && sudo modprobe nvidia_uvm
systemctl start ollama
Gonna cron it:
crontab -e
@reboot sleep 30 && /home/thaynes/workspace/fixollama.sh
Ollama Needs More Space
Stop Ollama
systemctl stop ollama.service
Set the new location for models usin these steps.
systemctl edit ollama.service
Add:
[Service]
Environment="OLLAMA_MODELS=//nas01/Data/LLM/Ollama"
### Editing /etc/systemd/system/ollama.service.d/override.conf
### Anything between here and the comment below will become the new contents of the file

[Service]
Environment="OLLAMA_HOST=0.0.0.0"
Environment="OLLAMA_MODELS=/mnt/nas01-data/LLM/Ollama"
Or here /mnt/nas01-data/LLM/Ollama.
Now we have
[Service]
Environment="OLLAMA_HOST=0.0.0.0"
Enviromnent="OLLAMA_MODELS=/mnt/nas01-data/LLM/Ollama"
Delete the models from the current spot or just move them
Start Ollama
Restart:
systemctl daemon-reload
systemctl start ollama.service or systemctl restart ollama
Broken due to resolv
thaynes@pop01:/etc/netplan$ ls -l /etc/resolv.conf
lrwxrwxrwx 1 root root 39 Jun 23 23:19 /etc/resolv.conf -> ../run/systemd/resolve/stub-resolv.conf
thaynes@pop01:/etc/netplan$ sudo ln -sf /run/systemd/resolve/resolv.conf /etc/resolv.conf
thaynes@pop01:/etc/netplan$ ls -l /etc/resolv.conf
lrwxrwxrwx 1 root root 32 Aug 24 18:47 /etc/resolv.conf -> /run/systemd/resolve/resolv.conf
# This is /run/systemd/resolve/stub-resolv.conf managed by man:systemd-resolved(8).
# Do not edit.
#
# This file might be symlinked as /etc/resolv.conf. If you're looking at
# /etc/resolv.conf and seeing this text, you have followed the symlink.
#
# This is a dynamic resolv.conf file for connecting local clients to the
# internal DNS stub resolver of systemd-resolved. This file lists all
# configured search domains.
#
# Run "resolvectl status" to see details about the uplink DNS servers
# currently in use.
#
# Third party programs should typically not access this file directly, but only
# through the symlink at /etc/resolv.conf. To manage man:resolv.conf(5) in a
# different way, replace this symlink by a static file or a different symlink.
#
# See man:systemd-resolved.service(8) for details about the supported modes of
# operation for /etc/resolv.conf.

nameserver 192.168.40.1
options edns0 trust-ad
search .
Then chattr +i /etc/resolv.conf
sudo ln -sf /home/thaynes/fakeresolv.conf /etc/resolv.conf
sudo ln -sf /run/systemd/resolve/stub-resolv.conf /etc/resolv.conf
Now the problem is Ollama can’t use the mount, maybe can be added to the group?
sudo usermod -aG thaynes ollama
sudo mount -v -t cifs -o credentials=/home/thaynes/.credentials,uid=1000,gid=1000 //nas01/Data /mnt/nas01-data
nas01group:x:1004:thaynes,ollama,root
sudo mount -v -t cifs -o credentials=/home/thaynes/.credentials,uid=999,gid=1004 //nas01/Data /mnt/nas01-data
sudo mount -v -t cifs -o credentials=/home/thaynes/.credentials,uid=999,gid=1004,file_mode=0664,dir_mode=0775 //nas01/Data /mnt/nas01-data
Now NOTHING can resolve!
thaynes@pop01:/mnt$ ollama run llama3.1
pulling manifest
Error: pull model manifest: Get "https://registry.ollama.ai/v2/library/llama3.1/manifests/latest": dial tcp: lookup registry.ollama.ai on 127.0.0.53:53: server misbehaving
But editing that file, which will change when we reboot so we must figure it out, got me going
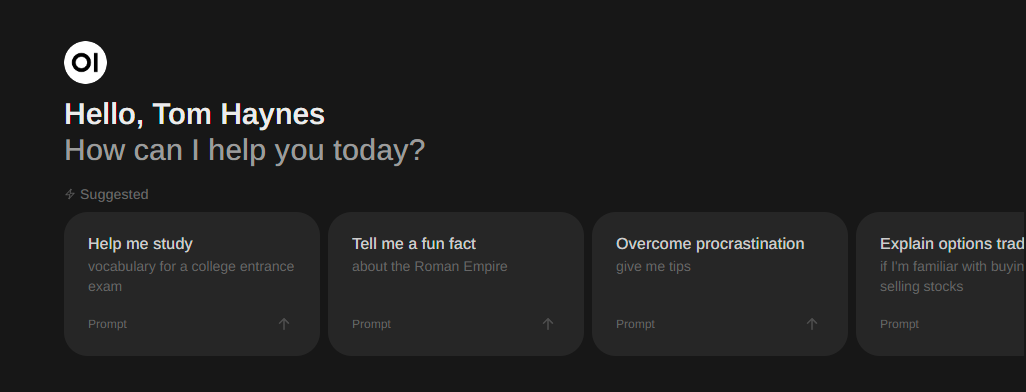
Open-WebUI
Open-WebUI is the front end people use for ollama. Helm charts
I copied values.yaml into localvalues.yaml and made the modifications I think are needed:
- Turn off the piece that installs the
ollamachart - Configure
ollama'saddress as192.168.0.85:11434 - Change the port to
8081since I don’t want to use anything as my80port
Some chatter online about needing a reverse proxy but I’m going to give this a whirl first.
Since I don’t know if this will add a namespace I’m going to try the commands in the default one. kubens default for that.
helm repo add open-webui https://helm.openwebui.com/
helm repo update
helm upgrade --install open-webui open-webui/open-webui --values localvalues.yaml
And it did go into default:
thaynes@kubevip:~/workspace/open-webui$ kubectl get pods
NAME                                    READY   STATUS    RESTARTS   AGE
open-webui-0                            0/1     Pending   0          26s
open-webui-pipelines-6d54bfdf4d-4qj2k   0/1     Pending   0          26s
http://kubevip.example:8081
If it goes bad:
helm delete open-webui
Went bad quick:
thaynes@kubevip:~/workspace/open-webui$ helm delete open-webui
release "open-webui" uninstalled
I believe the problem simply lies in my values package. There is a pvc it wants but it doesn’t know the storage class, ceph-rbd is ready to go thankfully!
That that the pvc going:
Normal SuccessfulAttachVolume 37s attachdetach-controller AttachVolume.Attach succeeded for volume "pvc-8aa70f5c-ad68-4256-a15e-f77800368f59"
Now it’s up but I can’t connect. The pipelines thing is also looking for a pvc, since I don’t need that right now I’m going to try disabling and running again.
The config it’s loading seems to disable it from accessing the internet. Someone said to try:
  - name: RESET_CONFIG_ON_START
    value: "true"
Didn’t work either. Maybe this is the reverse proxy thing… Next for NodePort.
This guide made my ask what CLusterIP was. It doesn’t look great according to [this].
And BOOM I’m in via http://kubevip.example:30000/ but it wants me to make an account!
Now I need to hit ollama, this seems reasonable.
It worked - with this:
server {
    listen 80;
    server_name pop01;

    location / {
        proxy_pass http://localhost:11434; # Ollama address
        proxy_set_header Host localhost:11434;
        proxy_set_header X-Real-IP $remote_addr;
        proxy_set_header X-Forwarded-For $proxy_add_x_forwarded_for;
        proxy_set_header X-Forwarded-Proto $scheme;
    }
}
Then:
sudo nginx -t

sudo systemctl restart nginx
And so it starts on reboot:
sudo systemctl enable nginx
http://pop01 could be configured in the UI to hit ollama. Cooking with gas now!
Stable Diffusion Web UI
Fine Tuning
Meta put out a good document on all the ways you could fine tune their model. Some seem to apply to other models but may be restricted. I’ll stick to the basics for now before venturing too far from Llama3.
First Try
https://catalog.ngc.nvidia.com/orgs/nvidia/containers/pytorch
docker run --gpus all --ipc=host --ulimit memlock=-1 --ulimit stack=67108864 -it --rm nvcr.io/nvidia/pytorch:24.06-py3
https://github.com/pytorch/torchtune
https://github.com/tloen/alpaca-lora
https://huggingface.co/meta-llama/Meta-Llama-3-70B
tune download meta-llama/Meta-Llama-3-70B-Instruct --hf-token <redacted> --output-dir /workspace/llama --ignore-patterns "original/consolidated*"
Then to fine tune:
tune run --nproc_per_node 2 lora_finetune_distributed --config 70B_lora.yaml
Going Small to debug
Since this is a docker container and I don’t know what I am doing I’m taring everything down and restarting each time. This time I’m going with the following:
pip install torchtune
tune download meta-llama/Meta-Llama-3-8B-Instruct --output-dir /workspace/llama --hf-token <redacted>
Copy the contents of this file into /workspace/8B_lora.yaml to have a local config, replace /tmp/Meta-Llama-3-8B-Instruct/ with the path we have, and then run:
tune run --nproc_per_node 2 lora_finetune_distributed --config 8B_lora.yaml
For good measure I also set export OMP_NUM_THREADS=2. I need to read up more to see if this is CPU or GPU since I’d want to use all the cores I can.
This time we got off the ground! My GPUs were maxed:
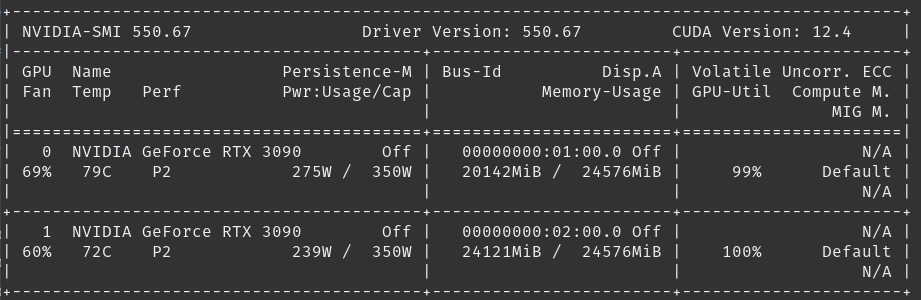
Plenty of data sets can easily be used to tune with this. Need to read about [configuration] first on how to set which to use.
They also use something called tqdm as the progress bar which shows how many seconds per iteration we achieve. I don’t have an idea of what I should be getting so it’s not useful yet:

After letting it run all night the tuning is complete!

But not without a cost:
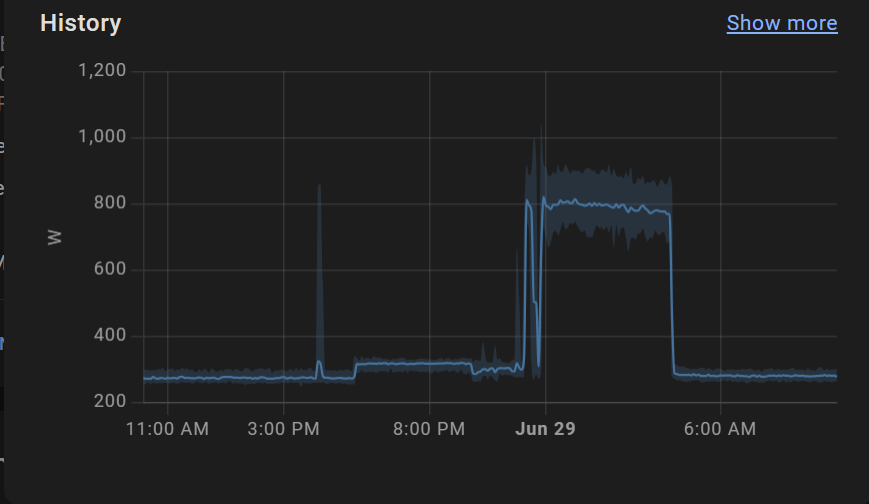
Eval
Now we need to evaluate the files thrown here:
INFO:torchtune.utils.logging:Model checkpoint of size 16.06 GB saved to /workspace/llama/meta_model_0.pt INFO:torchtune.utils.logging:Adapter checkpoint of size 0.01 GB saved to /workspace/llama/adapter_0.pt
Going to restart with the end-to-end how to instead
End to End
Proper Dev Environment w/ Docker in the Loop
Developing in a docker is weird but here’s what we can do.
Build a Custom Image
Looks like someone was wondering the same shit I was here but 6 years ago so I may have some sprucing up to do.
Create Dockerfile:
FROM nvcr.io/nvidia/pytorch:24.06-py3
WORKDIR /workspace
RUN pip install jupyter
EXPOSE 8888
RUN pip install torchtune
Build it:
docker build -t nvidia-pytorch-tune .
That makes the container and adds it to my local repo:
Successfully built ad748b40fbba
Successfully tagged nvidia-pytorch-tune:latest
Check it’s in the local repo with:
docker images
Run the Image
Run it with the args and stuff
docker run --gpus all --ipc=host --ulimit memlock=-1 --ulimit stack=67108864 -it -p "8888:8888" -v "/my-local-computer-files/:/my-docker-container/" nvidia-pytorch-tune
Then inside
jupyter notebook --port=8888 --ip=0.0.0.0 --allow-root --no-browser .
End to End Tutorial
Next we wil follow this tutorial to fine tune and evaluate a model.
First we need to get back into a docker:
docker run --gpus all --ipc=host --ulimit memlock=-1 --ulimit stack=67108864 -it --rm nvcr.io/nvidia/pytorch:24.06-py3
Once in we need to do this again:
pip install torchtune
The tutorial is for a single GPU but has batch_size=2 and dtype=bfloat16.
This guide looks pretty good for “end to end” workflows.
https://pytorch.org/serve/configuration.html https://pytorch.org/torchtune/stable/deep_dives/configs.html
Torchaudio
Found something called torchaudio that looks fun.
LibGen DB
This post details how to restore the DB.