Hosting with GitHub Pages
This site was hosted with GitHub pages using an $11/year domain from cloudflare. That’s the total cost of the site! You can see the source code for the site on GitHub.
Getting Here
I initially began documenting my homelab on this gist but wanted something that had a bit more style was still markdown driven. I’m a big fan of keeping the documentation with the code so the versioning is in lockstep but since I wasn’t documenting anything in particular I had a bit more flexibility. After googling around a bit I came up with the following options:
I didn’t look any further than the last bullet, the simplicity of hosting on GitHub Pages instead of from my own cluster won me over.
The Easy Part
The first thing I did was set up a GitHub Pages “Hello World” example repo and added DNS entries to Cloudflare for my domain.
Afterword I had some buyers remorse as there were many “start from scratch” options available like just-the-docs that may have simplified things but I was too committed by the time I found them. Even the GitHub w/ Jekyll doc didn’t require following the other docs.
I followed GitHub’s docs on creating the site and ended up with a repo with just an index.html with “Hello World” in it:

And like magic I could hit the site from https://thaynes43.github.io!
Adding a Custom Domain
Domains are cheap enough that I felt it worthy to spend a few dollars on one for this site seeing I plan to use it to retrace my steps when shit hits the fan. In the past I had used squarespace for the domain but I ended up using Cloudfare’s DNS so I figured I’d just purchase the domain from their registrar and save myself a few steps. In the process I got distracted and transferred my other domain over which apparently takes a week to process!
After purchasing the domain configuring it was fairly straightforward following this GitHub doc.
Cloudflare DNS worked with these entries:
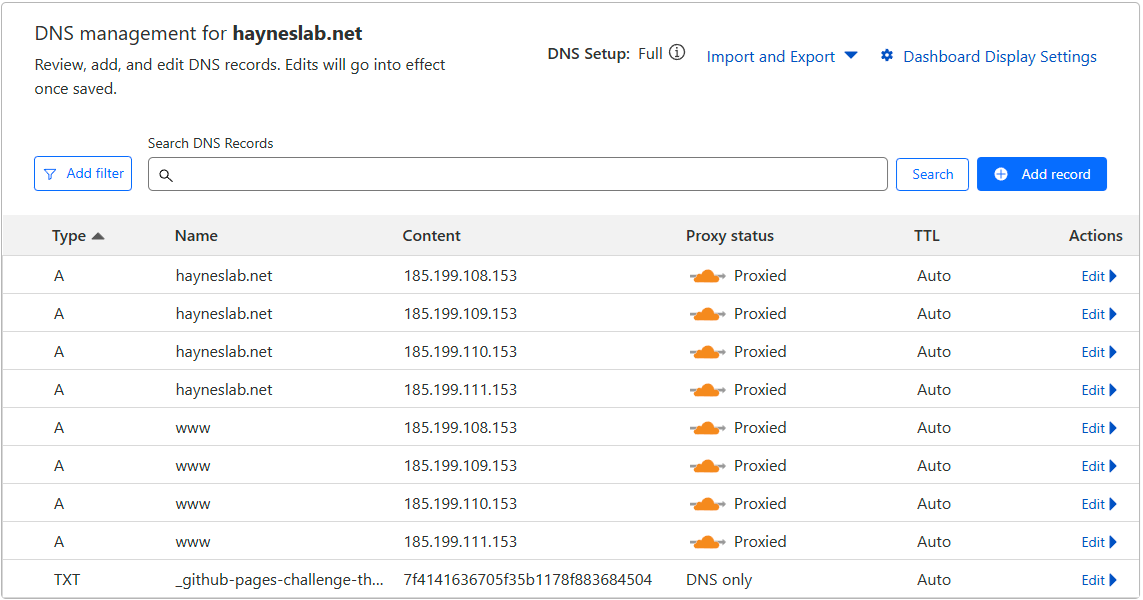
However, I’ve seen a CNAME used for www instead that points to the root domain. Not sure which is best there.
Also note you will want to go to SSL/TLS in Cloudflare to “Full”. This seems to work with “Enforce HTTPS” found in Pages repo -> settings -> Code and automation (navbar) -> Pages though mine seems to re-provision the cert every time I go that page which is odd. Full (strict) didn’t work at all for me, I’ve used this Nginx Proxy Manager by copying over the cert Cloudflare provided to the server which I don’t think you can do here.
Installing Jekyll & It’s Dependencies
At this point I thought I was hot shit having an $11/yr website that said “Hello World” in plain text. I figured I just had to setup some markdown files and I’d be cooking with pretty looking gas. Little did I know Ruby and it’s pretty Gems was about to hand it to me.
My first thought was to just throw it on a pre-existing Debian VM which was my control-plane for Kubernetes. My expectation was that I was just going to boostrap my repo and then be off writing markdown. This may have been true for somebody who knew what they were doing but I ended up with a big mess. I decided to get off that VM and leave k8s to it’s lonesome.
Using my proxmox cluster (which I’ll link to once I document it) I was able to quickly spin up an Ubuntu 24.04 VM w/ a UI and get cooking. This paid off in full because of the debug/test cycle that stood before me. However, installing Jekyll and all the Ruby madness ended up being a breeze just following these stes.
Using Jekyll
Next I jumped to the GitHub w/ Jekyll doc I realized the whole “Hello World” tutorial was redundant. All I needed from here was
jekyll new --skip-bundle .
Though I never looked up what was in that bundle…
From here I stumbled with what was in the GitHub doc a bit but I never got things working until I looked elsewhere.
- https://github.com/sfarrens/jekyll_tutorial/tree/master?tab=readme-ov-file#Customising-your-website
- https://github.com/yshmarov/yshmarov.github.io which seemed to map to this blog
The main things I had wrong from the GitHub doc were:
- I set baseurl but didn’t need to since my index is at the root
- I didn’t add Gems to the Gemfile for plugins correctly
- I didn’t delete the
index.htmlfile from “Hello World” which was favored overindex.md - I didn’t set the JEKYLL_GITHUB_TOKEN (see below)
To add the token go here
And use on the build env like this:
echo  'export JEKYLL_GITHUB_TOKEN=TOKEN' >> ~/.bashrc
source ~/.bashrc
Custom Theme
I started with the custom themes here but didn’t have much luck. I landed on a well documented and fairly versatile theme called minimal-mistakes which was something I really needed at the moment. After following the guide and correcting a few mistakes things were looking good.
What’s Next
Still a lot of work to do on the page. Writing this as I go so I can remember what I did. Now that the MVP is up I’ll work on circling back and migrating my notes and gist over. After that I can add a few more Jekyll features into the mix.
-
pagination going but that’ll have to wait for a few other projects.
-
Something to easily copy paste pictures in, maybe a VSCode plugin but I’d want to host them myself