Adding a New MS-01 Node
Forward
Much of what I learned that I go over here is thanks to “scyto” who wrote this amazing gist which was very similar to what I set out to do. He or she was using intel’s NUC13ANHi7 NUCs while I went with MS-01 which I feel will dominate this space due to their dual SPF+ networking and ability to fit enterprise NVMEs.
Assembly
For parts and service head over to this guide for an in depth look at getting an MS-01 assembled and running.
Since these suckers all look the same make sure you label each one!
BIOS
In bios I like to change the setting for what to do when the device receives power after an outage. I set this to auto boot but remember last state is a good choice too. I always want these suckers to be on.
PVE Install
Proxmox was the easiest OS ive ever installed. Ran into a few things that are good to look out for.
- Your country should at least be set right if you are connected to the network. This being off was a bad sign but rebooting straightened it out.
- If you end up getting to the IP/Gateway settings and the Gateway isn’t set automatically you are probably not connected to the network correctly. I hit this AFTER manually scrolling through to find the right country (ignoring the early warning signs) but a reboot straightened it out.
- Make sure your name matches the label you put on it
Configuring the Node
Accessing the Management UI
After I was up and running I added a DNS entry for
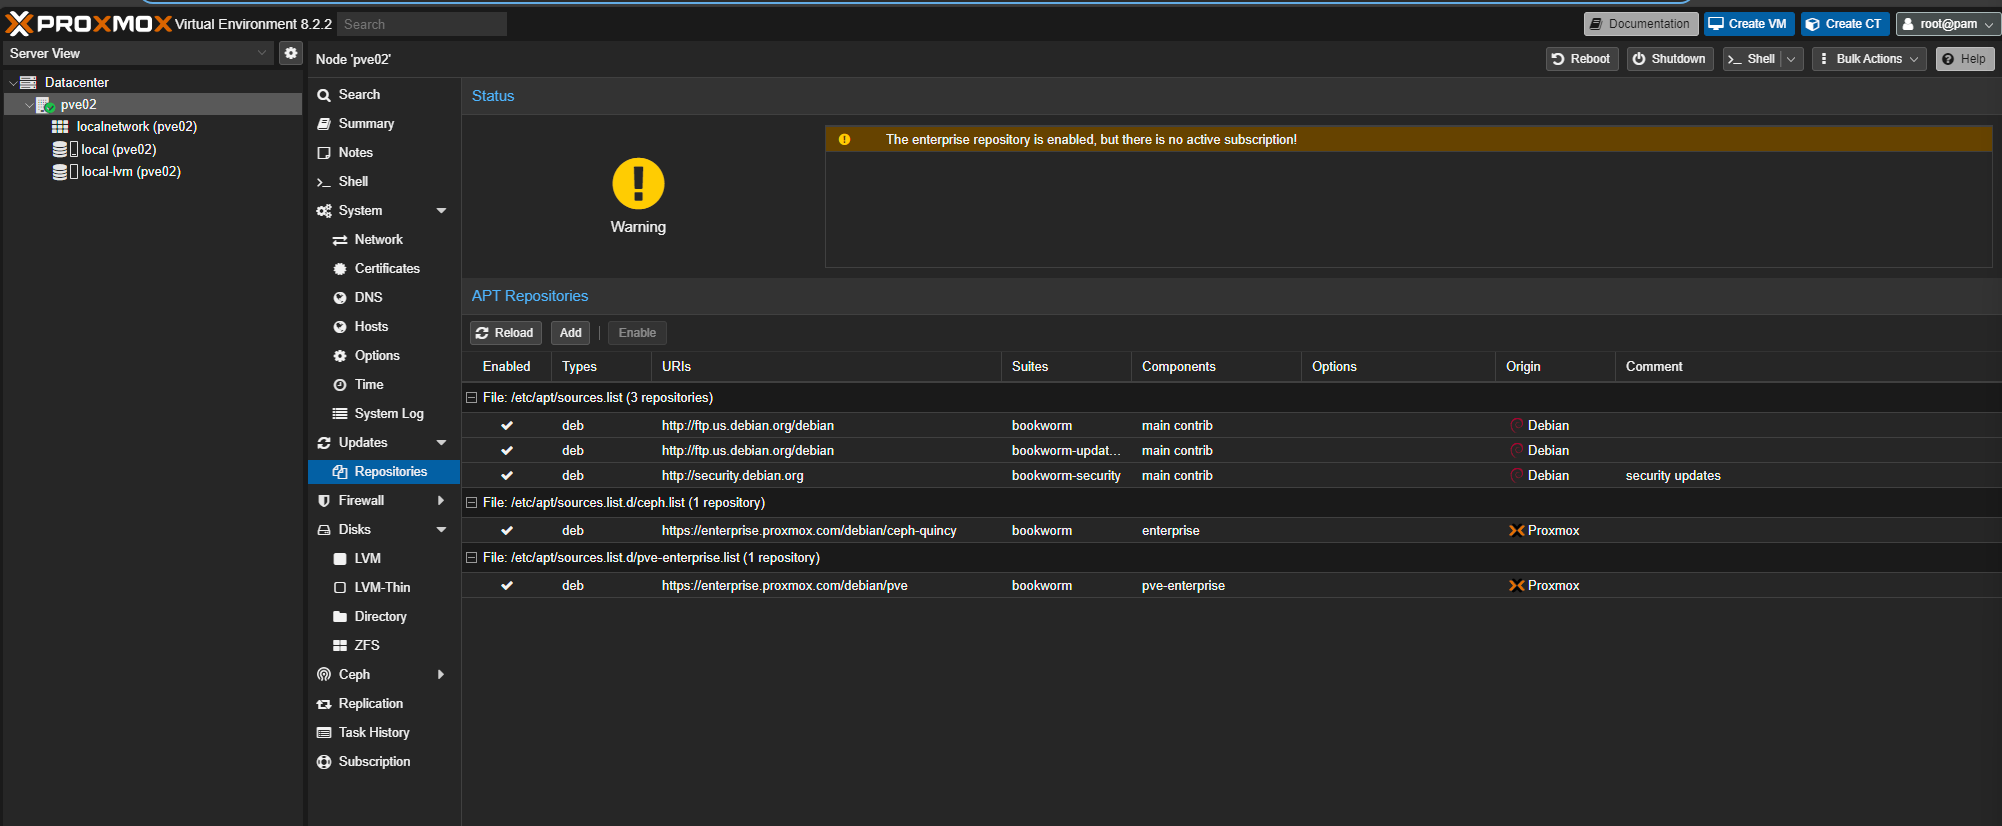
Getting off Enterprise Repos
Once you are in you’ll want to navigate to Datacenter -> your server -> next menu -> Updates -> Repositories
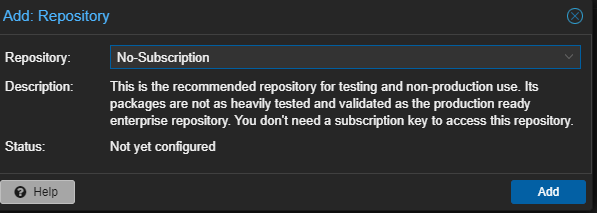
Then we need to switch to the No-Subscription proxmox repo by first adding it (click add):
And then disabling the enterprise repo:

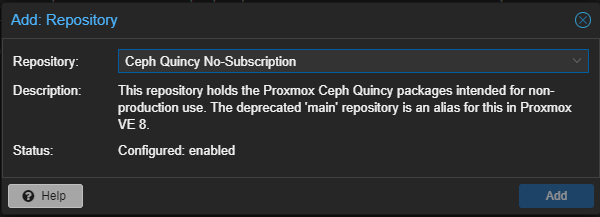
Since we are using Ceph we also need to get off that enterprise repo (click add):
And disable the enterprise ceph repo:

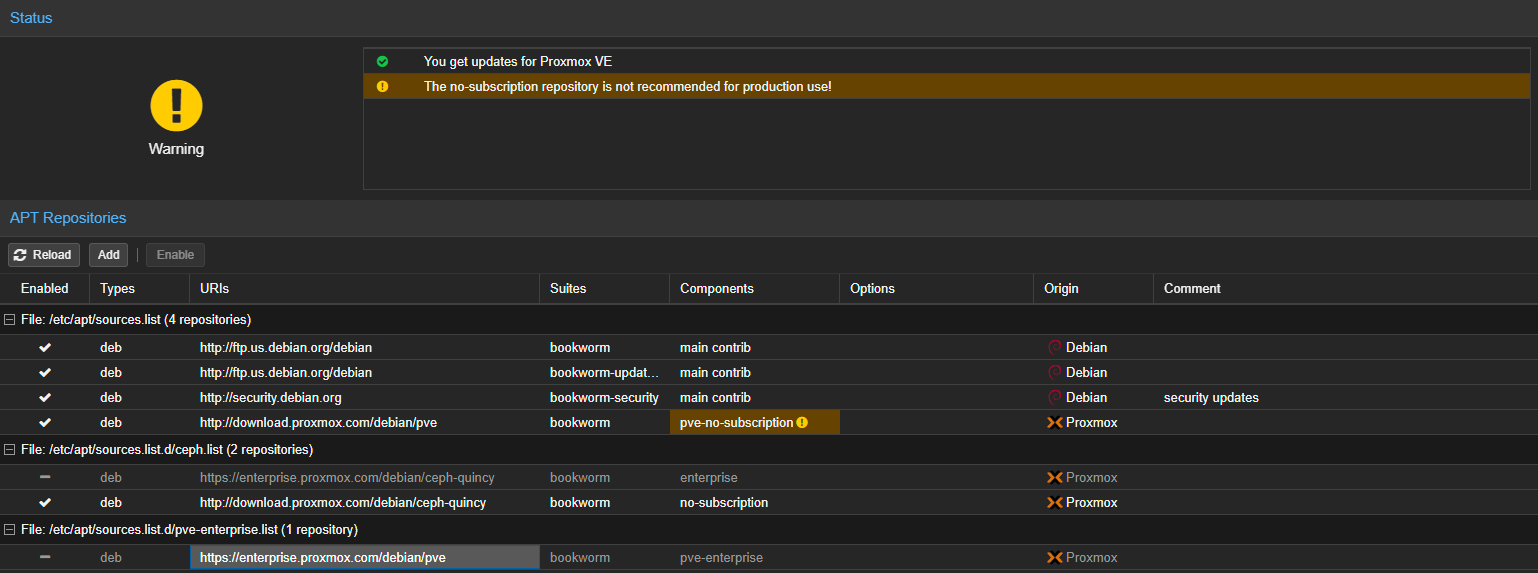
Now the page looks something like this:
Updates
Debian Stuff
Once all enterprise repos are gone you can update with our errors:
First:
apt update
Then:
apt upgrade
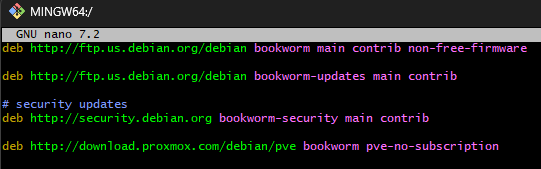
Microcode
I am told this is extremely important to do or things will be just terrible. To do this we need one more repo for firmware that has to be added manually.
nano /etc/apt/sources.list
Now add non-free-firmware to deb http://ftp.us.debian.org/debian bookworm main contrib so it looks like the top one here:
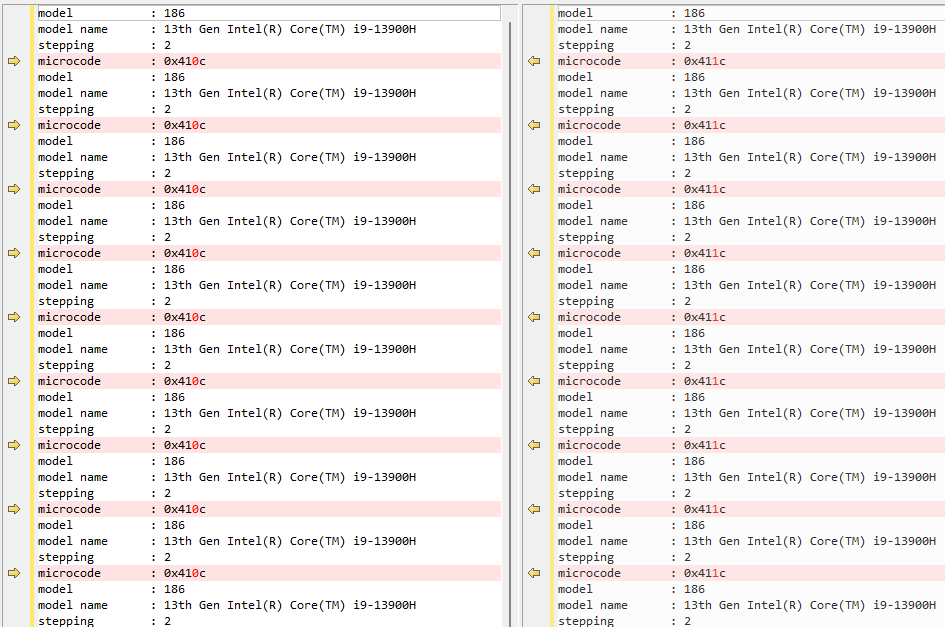
In order to be able to verify the update took we need to first know the version of the microcode we are updating from. For this you may run:
grep 'stepping\|model\|microcode' /proc/cpuinfo
Save the results somewhere. I used BeyondCompare for a quick diff with the results after the update.
Now update the microcode by running:
apt clean
apt update
apt install intel-microcode
Unfortunately this is one of the things that requires a reboot so go ahead and click:

Once back up give this grep another go:
grep 'stepping\|model\|microcode' /proc/cpuinfo
And verify the version changed:
Thunderbolt Networking (Optional)
Skipping this for now but I did do it for the first three MS-01’s then gave up on it and switched to SFP+ for my Ceph private network.
Configuring Additional Network Adapters
To add to the Ceph cluster we need the second SPF+ to have a static IP on the Ceph VLAN. I am also going to configure one of the 2.5 Gbe ports so it’s available if needed down the road (ran out of ports on the switch for the second one). This also needs a VLAN.
Go to Datacenter ->
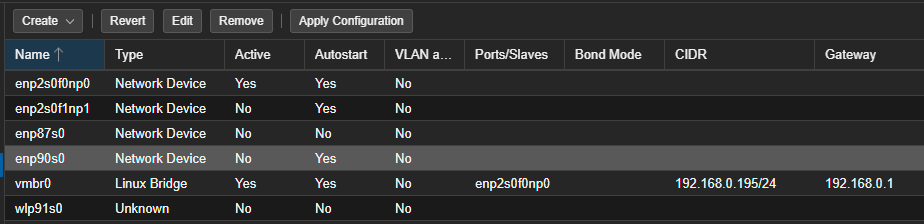
Now we need an IP for the second SFP+ and the 2.5GBe networks. Since they are on VLANs it should be easy to avoid IP conflicts unless you have a ton of devices.
For Ceph which was the enp2s0f1np1 adapter I configured:
And for the 2.5Gbe which was enp90s0 I configured:
Now I had to get these IP assignments to the adapters by adding a bridge. In network select “Create Linux Bridge”:
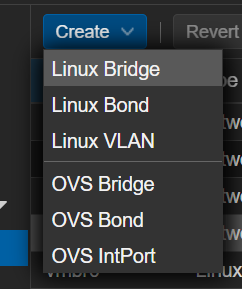
Then make one for enp2s0f1np1 to map to the IP we just set in the router:
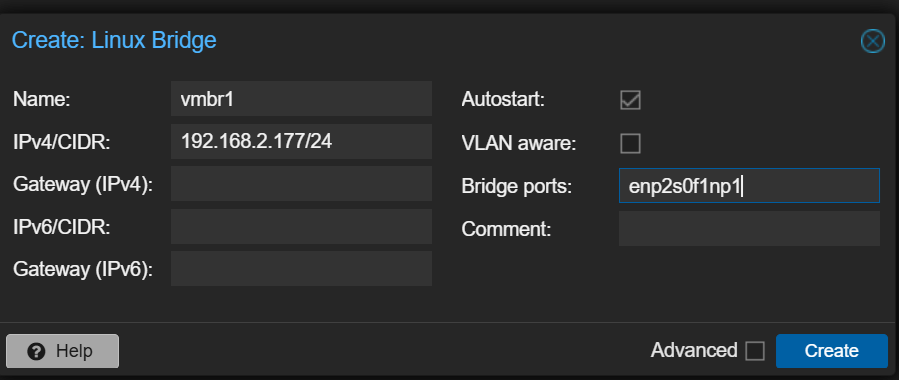
And the same goes for enp90s0:
Joining the Cluster
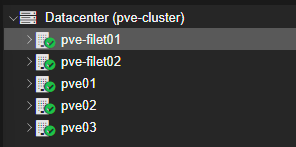
The node is now ready to do whatever is needed of it in the cluster. Now we need to go to the management UI for that, for me I currently have five nodes and will be joining two more:
From the main cluster UI go to Datacenter -> Join Information and copy the super secret “Join Information” by clicking the Copy Information button.
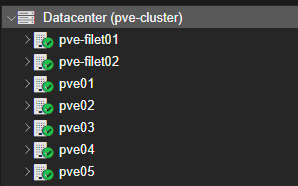
Now back to the node go to Datacenter -> Cluster -> Join Cluster and paste what was just copied, type in the password, and join away!. Soon you will see the nodes you joined in the main management portal:
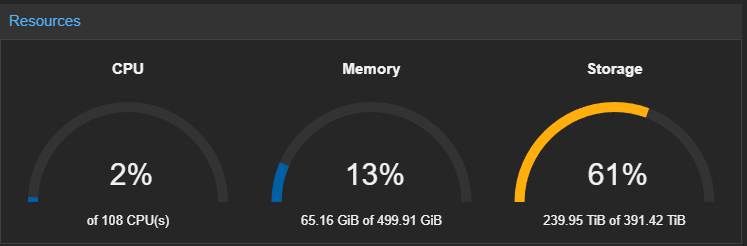
And Datacenter -> Summary will reflect the new resources you just beefed your cluster up with!
Ceph
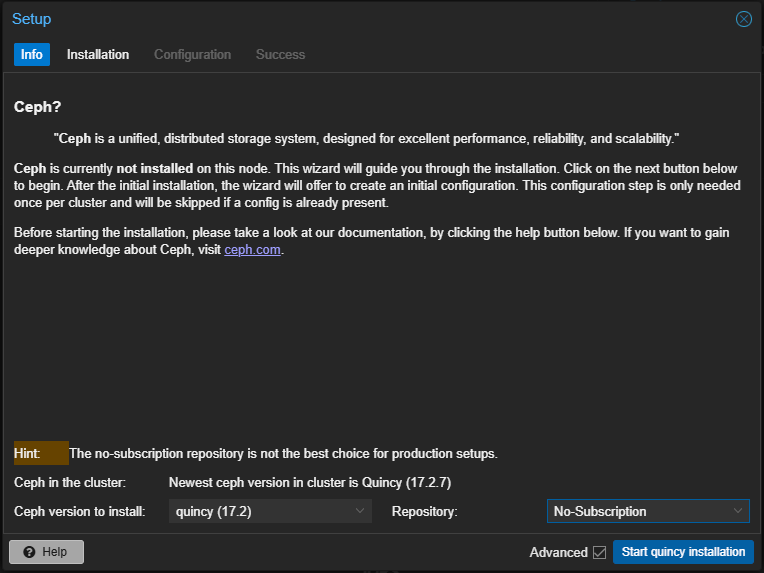
Since I plan on adding two OSDs to these nodes I will now need to install Ceph to do so. This can be done by going to the node -> Ceph and clicking “Install Ceph”. Make sure not to install enterprise packages
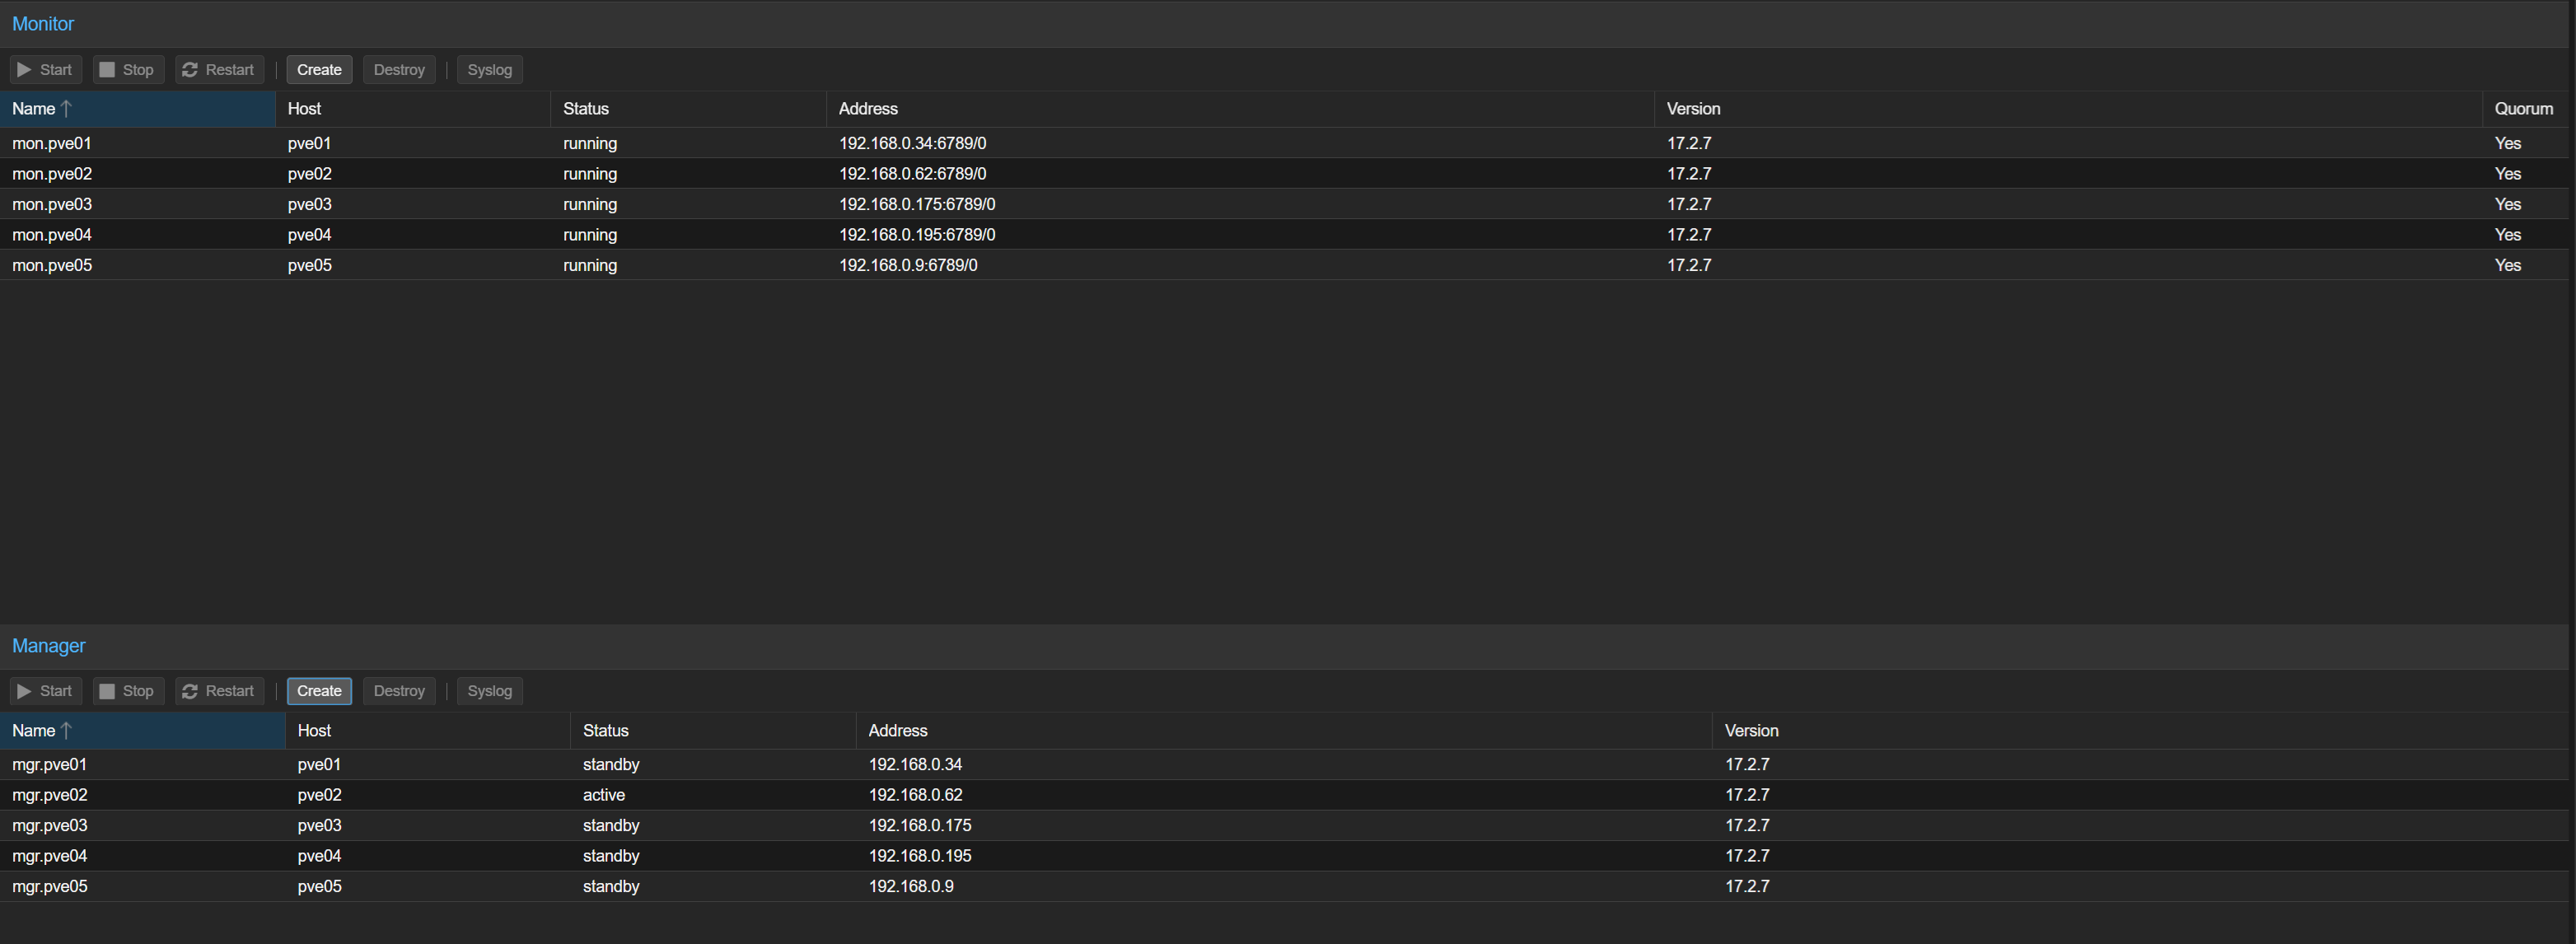
Add Monitors
Next we need to add a monitor using the command line because we have two IPs on the same subnet. TODO move one to another VLAN once we set up the IoT one.
pveceph mon create --mon-address 192.168.0.195
After you will see a new element added to ceph.conf:
[mon.pve04]
        public_addr = 192.168.0.195
Add Managers
Managers can then be added from the command line
Add Metadata servers
If you have any CephFS shares setup you can go to your node -> Ceph -> CephFS and add a Metadata server for each of the new nodes:
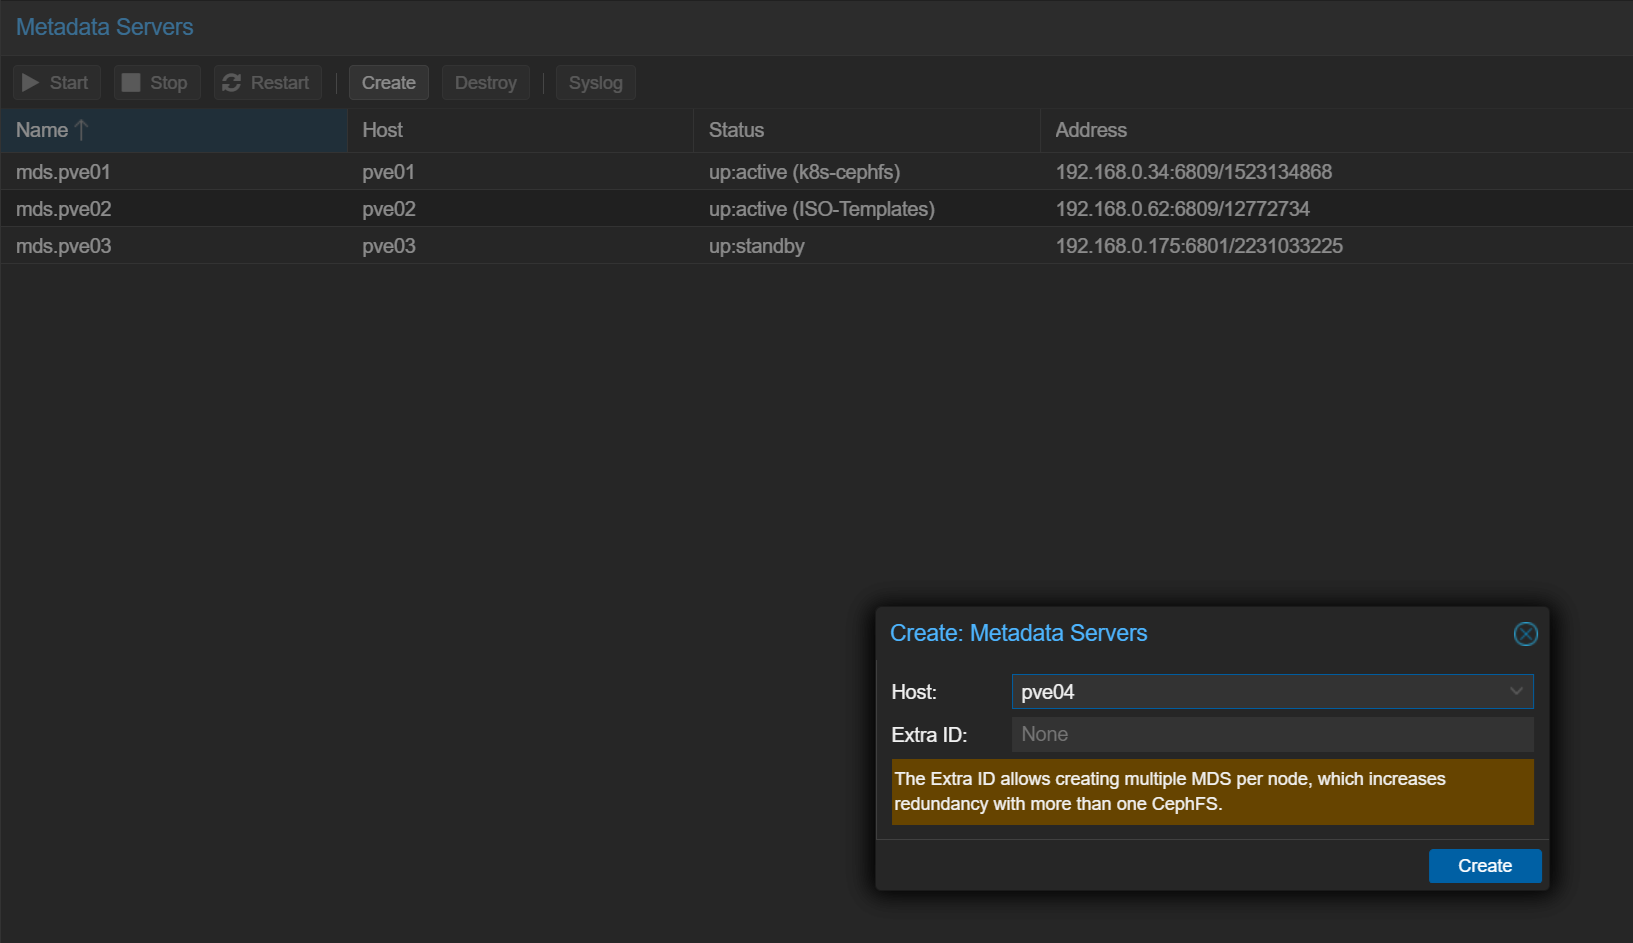
After you will see a new element added to ceph.conf:
[mds.pve04]
        host = pve04
        mds_standby_for_name = pve
TODO: I set up radosgw for my other three notes in a craze of madness trying to get Ceph-CSI to work. I don’t think I need this but we’ll see…
[client.radosgw.pve03]
	host = pve03
	keyring = /etc/pve/priv/ceph.client.radosgw.keyring
	log_file = /var/log/ceph/client.rados.$host.log
	rgw_dns_name = example
	rgw_frontends = civetweb port=192.168.0.175:7480
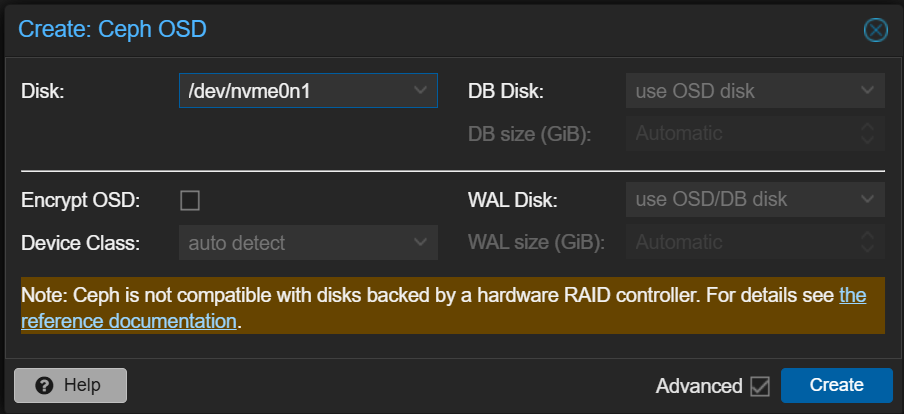
Finally, add the NVMEs as usable storage by creating some OSDs by selecting the node -> Ceph -> OSD -> Create: OSD and selecting the default settings:
You may need to refresh the page for them to show up:
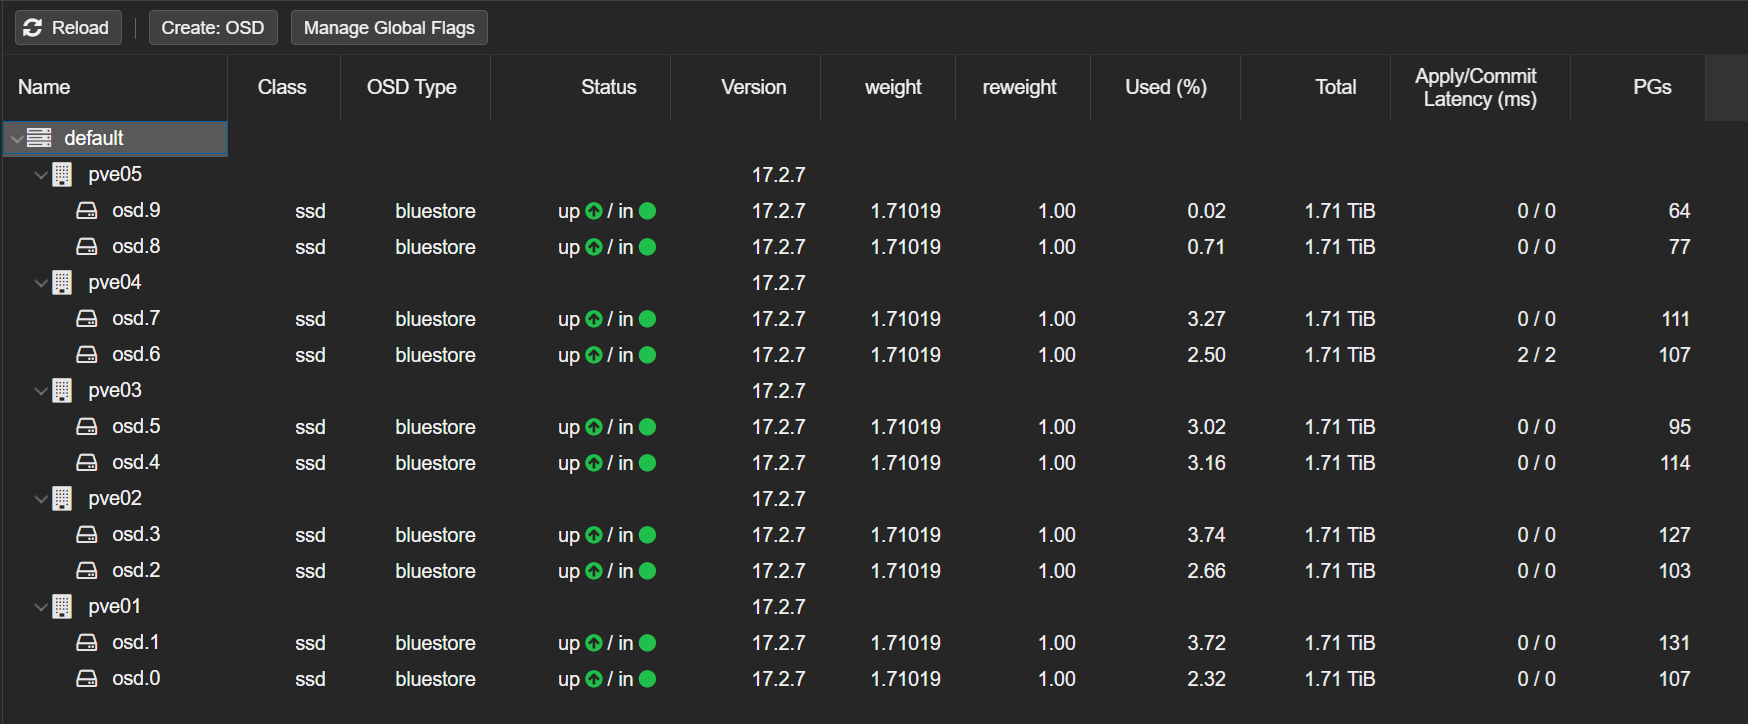
You can see the extra storage by selecting a node -> Ceph and looking at Performance:
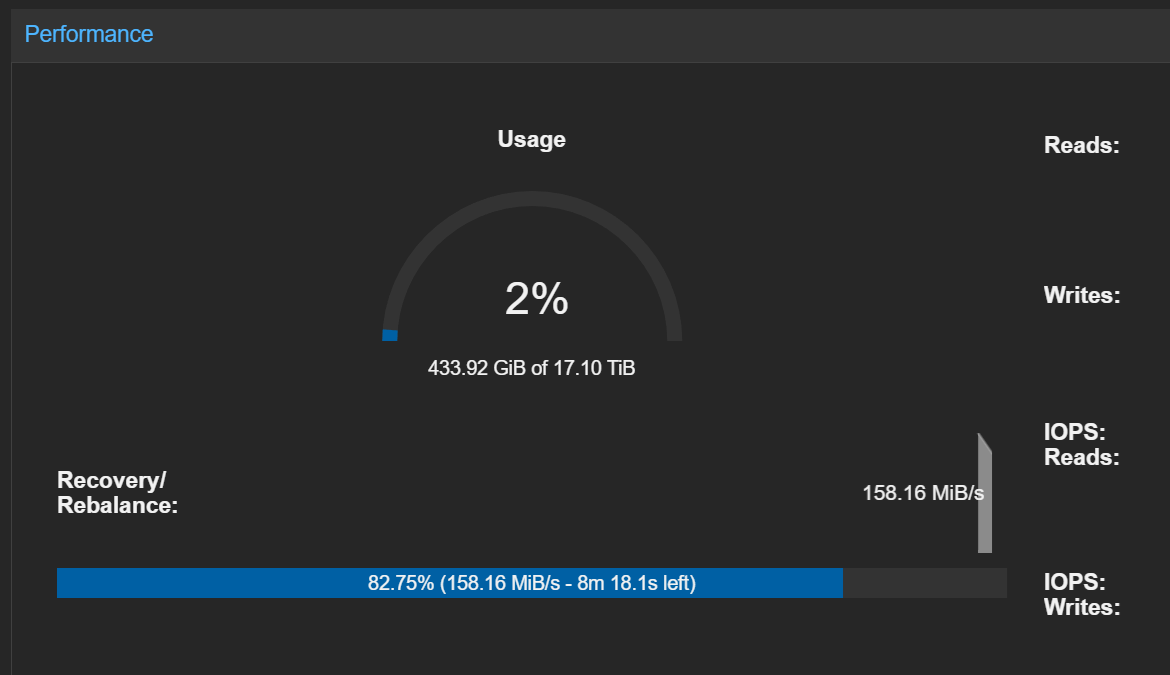
Since we added to an existing cluster some re-balancing will occur.
HA
Finally we can add the new nodes to our HA group by going to Datacenter -> HA -> Groups and editing the one made when the cluster was originally set up. You just need to check the new nodes and the group will be that much stronger.
Before:
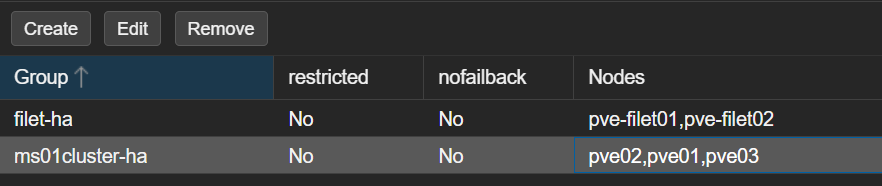
After:
